Introduction
These are the instructions for building a suukah that is stable, easy to
assemble, disassemble and store (in 1'x2'x8'). It should go up in about
30-40 minutes. The plans are for an 8'x8'x8' sukkah, but with some
work the basic design can be extened.
If these instructions look hard, it is because I am not a technical
writer. It probably will be faster to erect this sukkah than understand
these instruction.
The sukkahs presented on this page are meant to encourage people to
participate in the mitzvah of Sukkot. As such, they are presented
free of charge. The designs are my property and copyright.
While the designs are free of charge, I ask you small
contribution ($18) to the charity of your choice if you use one.
If you prefer a charity of my choice, please send it to
These funds set up in my daughters memory. Checks should be made out to :
The Shoshana Ruth Weintraub Fund for Jewish Youth Programming
or
The Shoshana Ruth Weintraub Fund for The Science Magnet Middle School Band Youth Programming
c/o The Austin Community Foundation
P.O. Box 5159
Austin, TX 78763
Materials
- 16 2'x8' lattices
- 8 1"x2"x8' Wood Pieces
- 4 Cinder Blocks
- 4 6' Pieces of rope
- 100 75 lb. Cable Ties
Tools
- for Assembly
- Two People
- A Step Ladder
- (Optional) A Sharp Utility Knife
- (Optional) A Small Saw
- for Disassembly
- Two People
- A Step Ladder
- A Sharp Utility Knife
Assembly
- If you are re-raising a sukkah from a previously assembled kit, you can
skip step 2 and 3 and go directly to step 4.
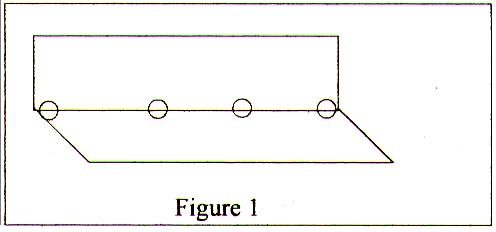
- Take two latices and lay them together lengthwise. Take four cable
ties and bind them together loosely (at the points circled in figure 1).
The two pieces should hinge freely so that one piece can fold on top of
the other. Hold one of the pieces at a right angle to that it is snug
but not tight. The piece should still hinge with some effort. The
final piece should look something like figure 1.
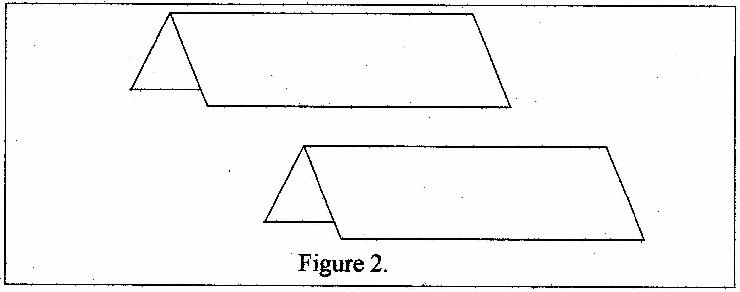
- Repeat the process with the other 14 pieces of lattice. You should have
8 'L' shaped parts.
- Take an 'L' and place it tent-like so that the connected part is off
the ground and it rests along the long edges. Take another 'L' and
place it paraelle about eight feet to one side (See figure 2).
- Now take a third 'L'. Place this 'L' across the lattices from step 4
so that you have a 'U' shape construction. This construction will
stand and make an arch-like structure in diagram 3 (Do not raise this
arch yet). Make sure that the lattice pieces match up so that the
overlapping wood matches the wood below. Using 6 cable ties, bind the
pieces tightly at the points indicated by the circles.
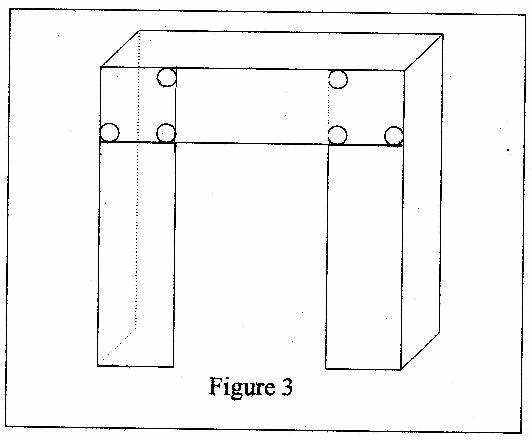
- Repeat steps 4 and 5 with three other lattices.
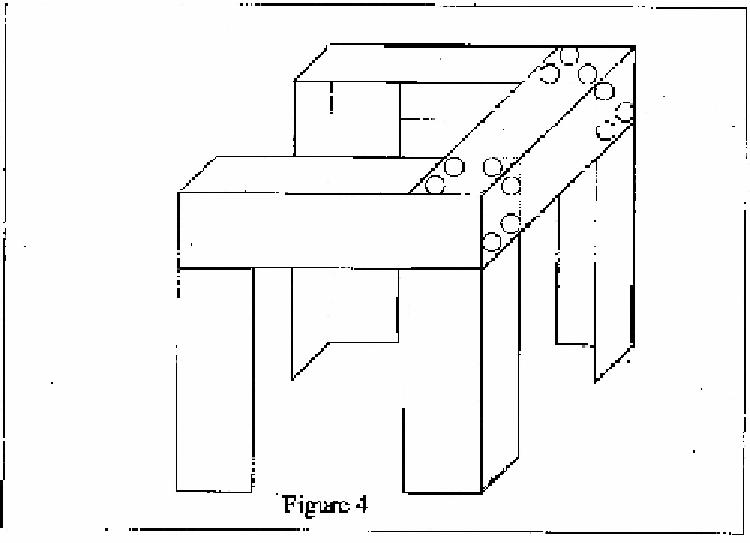
- You now have two 'arches'. These should be places opposite each other
so that they stand eight feet apart (you will need some help and a
step stool). Now take one of the two remaining 'L's and bridge the
two arches so that you have the three sided figure in figure 4. Make
sure the lattices matches up and bind in the places indicated with
12 cable ties.
- Now take the remaining 'L' and bridge it accriss the other side like
you did in step 7. Bind it with 12 cable ties in the similar places
in step 7. Your basic sukkah is now completed. The rest of the steps
are for stability. You should now have a sukkah with four doors and
a 4'x4' hole in the roof.
CYLAH - there are halachic questions with this design.
There is a question if 4 four doors are kosher. Consult your Rabbi.
If you fear halachic problems, two (or three) of the doors can be
closed up in one of two ways. You can either lay 2'x8' lattice at
the bottom of the door to make it a 4'x4' windows, or if you want
to be certain, you can completely close the doors with 8'x4' lattice.
I personally do the first - I like the look of the windows.
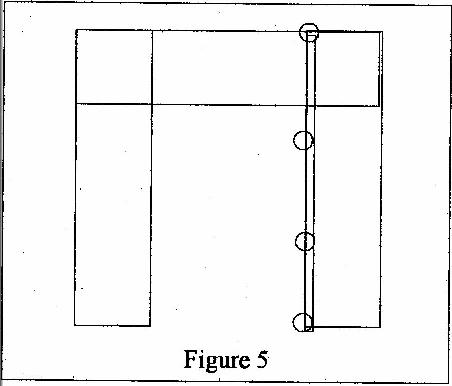
- Take a 2"x1"x8' piece and place it along the edge of a door. The
piece should go from the ground all the way to the roof (See figure 5).
Strap the piece in with 4 cable ties at the indicated places.
- Repeat step 9 on the other door post. And then repeat on the other 3
doors. The 1"x2" pieces are necessary to give your sukkah supporting
strength.
- Take a cinder block and place it with the flat side down in the
corner of the sukkah. With a piece of rope securely tie the block to
the sukkah. Repeat in the other 3 corners. These weights are
necessary to hold the sukkah in strong winds and to prevent the
sukkah from becoming top heavy.
- (Optional) With a sharp knife trim the tails off the cable ties so
that they are more attractive. Trim any excess off the 1"x2" that
reach through the roof so they are more attractive.
- Now cover with tree limbs and cover however you like. A rule of
thumb is that sitting in the sukkah you should be shaded when the
sun is out, but the covering should not be so thick that you can
not see the stars through it at night.
Disassembly
- With a sharp knife cut the cable ties and disassemble in reverse order
from steps 10 through 3. Do not disassemble the 'L's.
- Fold the 'L's flat.
- Store until next year. You will need 68 more cable ties. These are
available at electric supply stores or you might find them in the
electrical section of your hardware store.
HOME
TOP
INDEX
FRAMES
PATH :